
How To Create And Add A Stylish Signature To Your Blogger Posts
If you look at the bottom of the posts in many blogs you will see they finish with a signature.I think the signature looks great and adds a bit of style to the posts.These signatures are very easy to create and add to your blog and in this post i will show you how.You can actually use a small pad to write you signature or pick from one of hundreds of pre-made signatures.I suggest using the pre-made signature, using the pad to create your actual signature is almost imposable.
This Post Has Been Updated On 8th June 2012.
This Post Has Been Updated On 8th June 2012.
Create the signature
I'm going to create another signature and walk you trough the steps as i do.
Step 1. Go to My Live Signature and click 'Start Now' you don't need to register.
Step 2. You have 2 free options here, choose to use the wizard as i did or be brave and try to write one.
Write in your name as i did below :


Follow the steps to design the signature :
-You now choose the size i choose size 3.
-Select the color, i choose a transparent background.
-Choose the angle slant, I choose 2.
Now your signature is ready, click on 'Want to use this signature?' as below :

Now choose 'Generate html code' you will be provided with the code :
This is the code for my new signature :
And this is the new signature :

If you know how to upload the image to Blogger or Photobucket or any image hosting you may want to do that, if not don't worry we will use it as it is.
We only want the image and we don't want the image to be a link back to My live signature so you can remove the code in blue and keep the code in yellow :
(If your not sure how just change www.mylivesignature.com to the address of your blog)
Add the signature to your blog
There are two ways to add the signature to your blog the first way is the easiest but it wont be in you previous posts.The second way adds it directly to your template.
First way to add the signature to your blog.
.
Step 1. In the new Blogger dashboard click the drop down menu for your blog > Choose settings > On the left of the settings page choose 'Posts And Comments'.
Step 2. At the top of the Page you will see 'Post Template' paste in the code and save:
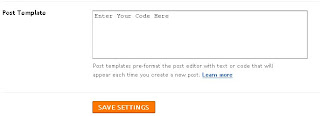
Now every time you you go to write a post the signature will be already in the post.
How To Create And Add A Stylish Signature To Your Blogger Posts
 Reviewed by Danish Yaqoob
on
23:34:00
Rating:
Reviewed by Danish Yaqoob
on
23:34:00
Rating:
Reviewed by Danish Yaqoob
on
23:34:00
Rating:


Hi I am huge fan!! You inspire me, you let me know that success is REAL! So I have started a niche site http://icydiaios.com ... and I am having a hard time , (and fun time)putting it together, but nontheless, its coming together.
ReplyDeletethanks for visiting
DeleteYour post is good i try it but it did't work..can you help me?
ReplyDelete